Showing posts with label Tutorial. Show all posts

Saturday, October 3, 2009

Happy Fall...


Happy Fall.


I worked out in the yard with the hubby today. Despite wearing a sweatshirt and...uh...glistening from my elbow grease expenditure, I was chilled.

Fall is here.


Have YOU decorated for the season yet?


Take one boring, inexpensive grapevine wreath:


And add (stick em in, glue gun em in, wire em in) a bunch of fall-ish berries, sticks, floral picks, whathaveyou. Then HANG it UP.


Me? I had a TON of red berry sprays that I yanked out of a 75 cent garage sale wreath. And yes, I DID spray paint half of them orange. Cause the season demands some ORANGE. Also threw some leftover sticks in there because this girl loves her some curly willow:


Fall is here. Let the apple cider consumption, harvest candle flickering, cozy blanket snuggling and fireplace crackling commence...

A

Find more fall projects at:


DIY Day @ ASPTL


Wednesday, September 16, 2009

Wall Organizer With A Pinch Of Sassification...


I bought this...uh...functional wall organizer in an effort to help my husband and I (read: ME) become more organized and enhance mail communication.

It has sat in the fish-tank room for just over a year now. (Yes, we have a room in our house whose sole purpose is to access the fish tank...and apparently to house forgotten functional wall organizers.)

Anywho.

Bubbalu found it, forgotten and neglected, a few weeks ago and kindly Bubbalized it for me:


Meaning he scribbled all over the thing with the dry erase marker.

Did you know dry erase markers don't erase from cork board?

Didjya know dry erase markers don't erase from the fabricy middle thingy that I'm not sure what it's called?


And ALSO, did you know dry erase markers don't erase if they are left on the dry erase board for oh...365+ days?

Who knew?

Well, I do NOW, obviously.

So, I found it hiding in the lovely smelling fish-tank room and decided it needed a revamp. A little sassification, if you will.

Deconstruct.

Prime and spray paint frame.

Recover cork board, fabricy middle thingy that I'm not sure what it's called and dry erase board...which also happens to be magnetic. Handy!

Put it all back together again and marvel at all the sassification going on:


Now I have a handy dandy sassified wall organizer for my craft room to help me, I GUESS, organize my ideas a bit. I have occasionally been known to be slightly scatterbrained...hopefully this will help.


For more DIY projects check out A Soft Place To Land and The Shabby Chic Cottage..

A

Monday, September 14, 2009

Not Your Average Undershirt...


Well, I did it. I had warned my husband.

Inspiration hit and I just went with it.

Take one unused, rejected by the hubby because "it just doesn't fit quite right" white t-shirt and start CUTTING IT UP.

I love this. I really really really love cutting up shirts.

I may have an obsession.

Trace around your favorite fitting v-neck shirt and start cutting the shape out:


Trim the finished edge off the sleeves and set them aside. Use all leftover fabric pieces to cut out 2 sizes of heart shapes. I used a cookie cutter for my guide:


And ended up with a nice pile of cut-out heart shapes.

Took the sleeve edges/hems, cut them in half, and stitched them on to the v-neck:


Basted, ruffled and reattached the sleeves, then tacked on those heart shapes creating a lovely embellishment:


Then wait a week. Finally realize the shoulders are too wide, trim more off of the shoulders, seam rip the sleeves off, then reattach them correctly.

When all is said and done, your previously owned by hubby undershirt has transformed into:


Not too shabby for an unused rejected undershirt:


A

Tuesday, September 8, 2009

Maternity Shirt Renovation Episode 2...


Continuing in the thrifty renovation theme, I cut up some more Maternity shirts and made em all nice and sassy.

First up, you need to meet Mrs. Blah Black Maternity Shirt, sister to Mrs. Blah Yellow Maternity Shirt.

What can I say, I find a style that works and I go with it...should I go ahead and admit that not only did I buy black and yellow, but I also have it in pink and sky blue as well? Hmmm. Yeah, that's FOUR of the same shirts. They looked good, and they were ON SALE!

Internets, meet Mrs. Blah Black Maternity Shirt:


See? BLAH.

Notice the pins running up the left side? That's right, I sliced and diced and un-maternicized it.

However, it was still BORING, BLAH and PLAIN.

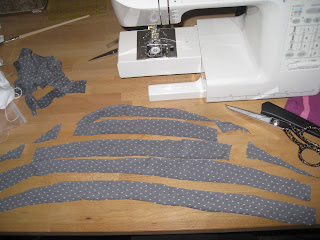
I dug around in my fabric stash (one or seven tote bins full) and pulled out two neglected leftover knit sleeve pieces. They are a dark gray with white polka dots on them. PERFECT! Fall is upon us, and gray is still in!

Slice off the edges:


and cut even width lengths (eyeball it, just say no to measuring with this project) and you have:


I got five per sleeve. I tried to quickly baste and ruffle them with my fussy, haven't had a tune-up in five years, sewing machine...which not surprisingly balked at the project.

What to do, what to do.

Craft bugs are a'biting and no sewing machine! NOT ACCEPTABLE.

Send sweet hubby over to borrow MIL's sewing machine (thanks Mom!) and get right back at it.

Quickly basted and ruffled those repurposed sleeves and sewed them onto Mrs. Blah Black Maternity Shirt, which transformed her to Miss Sassy Black Ruffly Shirt, sister to Miss Sassy Yellow Bunchy tank:


Ah, Miss Sassy Black Ruffly Shirt, I believe you and I are going to be long-time BFF's...

A

Friday, September 4, 2009

A Flock of Frames...


I have some very blah walls. They are painted a dark contractor yellow-beige and are quite boring. While searching for something wallet-friendly I found this beautiful wall mirror:


Drool.

But I can't justify the $599 price tag.

I've been digging the idea of clustering empty frames to achieve a simplistic yet eclectic feel:

Apartment Therapy

I think all black or all white create a stunning, pleasing result:


Country Living

So I traipsed down to the local thrift store and lo and behold, picked up about 4 decorative edged frames. PERFECTO! I also had a few lying around awaiting inspiration.

I turned Bubbalu's neglected swimming pool over, threw on a drop cloth and started spray painting.

Frames before:


Can I just say? Get that handy dandy snap and spray paint can handle thingy...I have a massive case of spray can-itis.

I picked up one more large vintage frame at a garage sale last Saturday for $1.50...my kind of price!

Spray spray spray...

Once dry, set out the frames on the floor, rearranging until you feel the look is cohesive and makes you feel all happy.

Enlist hubby's help to hang on wall, as hubby may or may not be the king of centering, leveling and measuring.

Looky there, now I've got something on the wall other than paint!

After:


Really now, this project cost me about $10.00.


Thrifted frames - $6 ish

Black spray paint- $3.99

Lance was doubtful that this would look good. Once I hung them up (and told him I spent only $10) he conceeded that it wasn't a complete disaster.


Off to spray paint more treasures...

A

Check out more DIY transformations at the Thrifty Decor Chick Before & After Party:


Funky Junk's Sat Nite Special

Wednesday, September 2, 2009

Mrs. Goodwill Drab to Miss Sassy N. Fab Chair Revamp...


I've been feeling super inspired by all the thrifty crafty DIY and fabulous revamp blogs I've been reading. So I gathered up my spending cash (less than $20.00 - whoopadeedoo....can you buy ANYTHING anymore for less than twenty bucks?), pawned the kids off on my dear hubby, jumped in the car and headed to our local Goodwill store for some thrifting therapy.

I eagerly browsed around looking for something horrible and decrepit with a splash of potential.

There was one fabulous chair that I passed up because it was too expensive.


Y'all - Here I am, IN A GOODWILL STORE, turning my nose at a perfect revamp project because Mrs. Stinginess did not want to shell out $14.99! Ha! Told ya I was thrifty...or dutch, but whatever.

However, I'm glad I passed up the aforementioned overpriced chair because tucked in the back high up on a shelf I spotted this sad, forlorn and forgotten chair:


Goodness gracious, HELLO POTENTIAL!

I was muchly thrilled. And even better? The stingy dutch woman living inside of me (Hi, Mrs. Stinginess, I know you are in there) was pleased as punch to see a price tag of $3.99.

YOU BETCHA!

I picked this sucker up for less than a Starbucks Venti Pumpkin Spice Latte!


Can ya tell I was slightly ecstatic? I wheeled my chair-laden goodwill cart proudly, wondering if the other patrons were kicking themselves for passing up my treasure.

The seat fabric? Detestable. Fuzzy orange with shiny gold stripes:


Blech!

I unloaded that thing into my garage and took Bessie to it:


Yeah, I named my cowtastic screwdriver Bessie.

Yanked that seat off, threw the fabric DIRECTLY into the garbage, then sanded, primed and spray painted that chair to gorgeousness:


I added a bunch of batting layers to the squashed seat pad:


Stapled on some fantastic new fabric (that cost more than the chair), Bessie reattached the seat and voila!

Meet Mrs. Previously Goodwill Drab, now known as Miss Sassy N. FAB:


LOVE the lines of Lil Miss Sassy...properly distressed, of course.


I have a slight obsession with green. I actually gasped OUT LOUD in the fabric store when I saw this bit o green gloriousness.


Before and after shot, from DRAB to FAB! :


Check out more DIY projects over at : A Soft Place To Land, the Shabby Chic Cottage and Thrifty Decor Chick...

A

Friday, August 21, 2009

Piano Bench Revamp...


I was all energized and inspired yesterday so I picked up my handy dandy screwdriver (it has a cow print on it...it's pretty much cowtastic) and started taking apart the piano bench:


(Mom and Dad, you might want to look away now. I know this upholstery fabric was o-so-stylin' back in the day, but it had to go. What you'll see next might pain you.)

Next up, boring needle-nose pliers to start yanking out staples:


This got old QUICK. So much so, that I found a better method as opposed to yanking out each staple one by one.

I started cutting the fuzzy maroon upholstery fabric. It was actually kind of strange. Not to go and get all philosophical on you, but all three of us kids sat on this bench to learn to play piano. It almost felt like I was destroying a piece of my childhood when cutting it....OK, moment's over!


I found by cutting and then yanking the fabric I popped out most of the staples:


Then I traipsed up to my craft room to finish the project. I made sure to iron the fabric first and then centered the bench, foam pad side down, on top of it.


Start stapling! I love my staple gun. It's therapeutic. I made sure to pull the fabric tight and mitered the corners, like a good CNA should do.


Trimmed the excess fabric:


Then added a coordinating liner fabric, edges tucked in as nice as you please:


Then began the arduous task of reattaching the hardware...which I completed without the use of a drill or a male. Proud of me Dad? And yes, it DOES open and close, and yes it IS centered correctly.


Nevermind that I have one puncture wound and five blisters.

Here is my finished, revamped piano bench:


I TOTALLY would have painted the wood black, but I respect my Father's health way too much to do that to him. See, he made this bench by hand, and in his book painting Mahogany is akin to spray painting a diamond.

I am happy with the results, it makes me smile:


Hmmm, (peering around the house) what ELSE can I revamp?

A

Check out Kimba's blog for more DIY projects!
Related Posts Plugin for WordPress, Blogger...