Showing posts with label Travel Trailer. Show all posts

Friday, October 25, 2013

Travel Trailer Makeover, Part 9: Bunk Beds and Windows

Pigs are flying, we finally made it to Part 9 of the Travel Trailer Makeover Series: the Bunk Beds and Windows!

I really decided to abandon the idea of color matching the entire trailer and instead customized the bunks to each kiddo.  Here is what the trailer bunks looked like right from the dealership:

Rather boring, pretty dull. Ruffly curtain in hunter green leaf patter...well. I WANTED to burn it but kept it for possible future resale purposes.

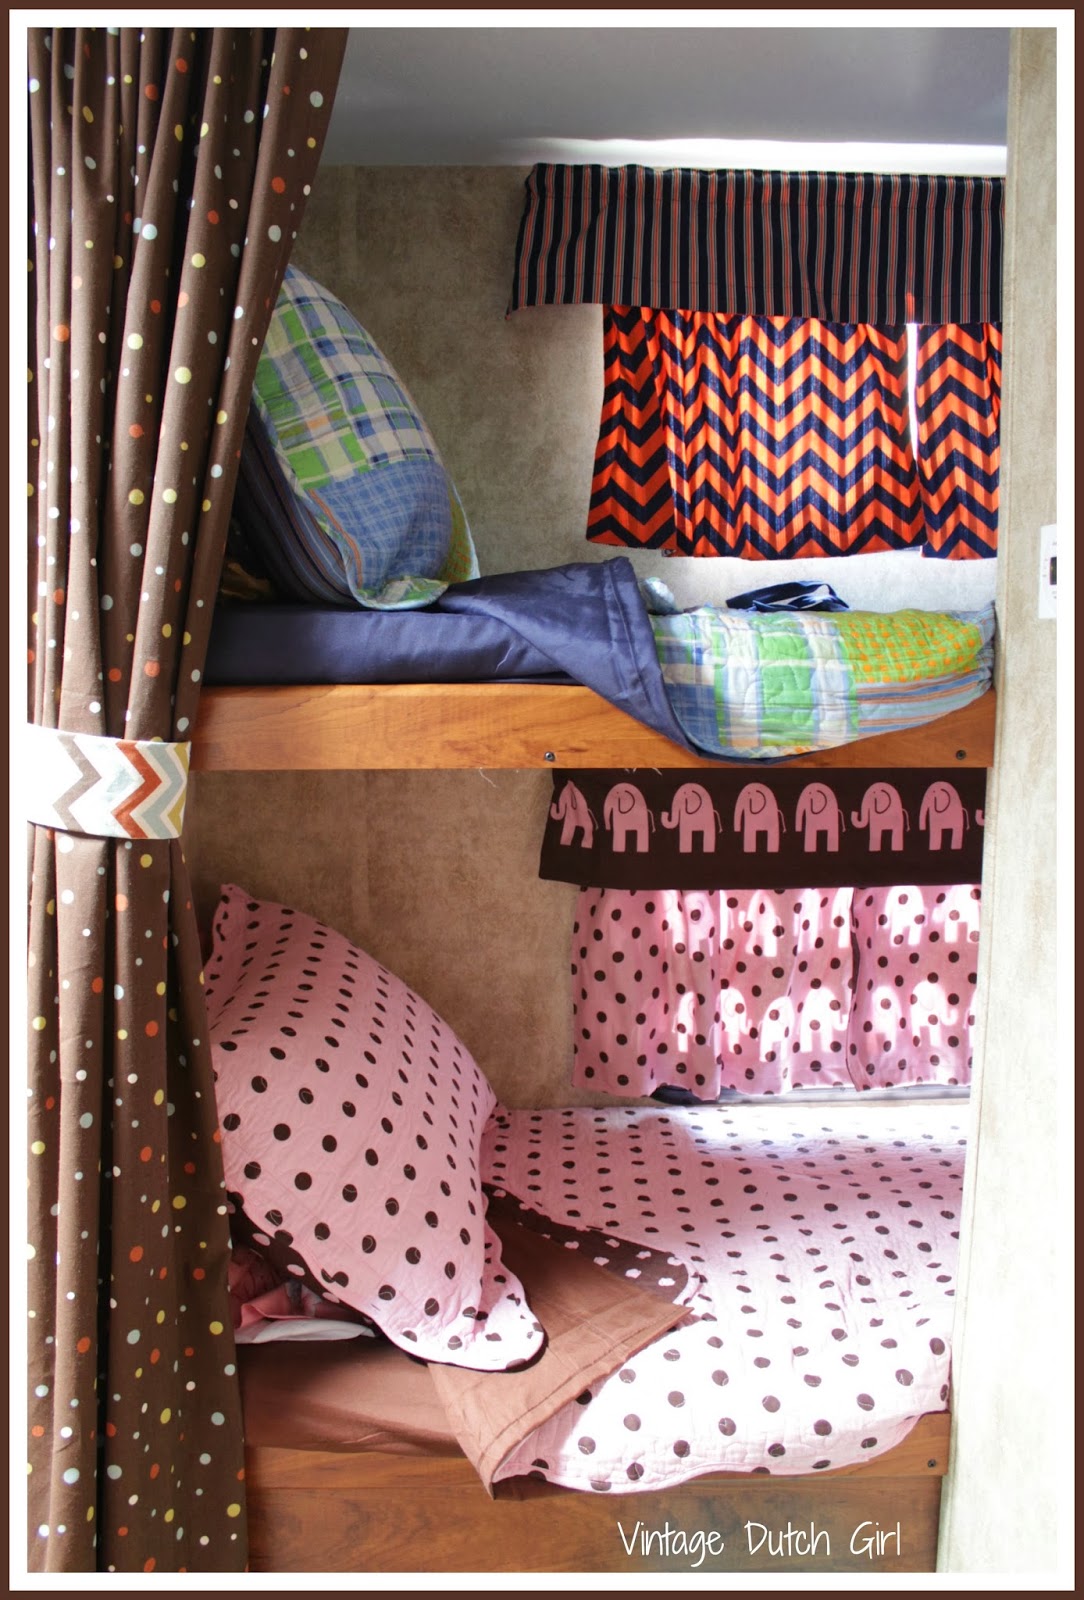
There was too much beige going on in those bunks. I like COLOR.  Back to fabric shopping! I still used premier prints fabric because I LOVE it. I had a few ideas of fabric patterns and combinations but let each kid pick their color and pattern.

Bubbalu chose a navy and orange chevron and coordinating stripes print, Lil Chick picked chocolate brown and light pink elephants and a coordinating polka dots print:

Yeah. Those don't really match. At all. Oh well! It's COLOR.

Also, I decided that in order for me to be able to get away with sneaking into the kitchen area of the trailer at night and eating chocolate necessitated some sort of privacy screen or curtain.

I used a tension rod and these little stick and screw on holders designed for shower curtain rods to hang a polka dot curtain:

I made a tie-back thingy out of the chevron multicolor fabric and velcro, then just screwed it into the side of the bunk bed. Is this a permanent fixture? With my kids? Probably not. How do I know this? Because they have already hung on the curtain and pulled it down.

Twice.

So, the picture above is ALMOST the same, just imagine that the curtain tension rod has a large dent in and is no longer straight. Then yes, it's the same.

For Bubbalu's bunk I make him reversible curtains and valance so that I can change it out if I ever feel like it...and bonus, I didn't think about or notice it until after I was done with the redo but you can see them from the outside and they are cute!

Lil Chick got pink, pink and some more pink.  And some chocolate brown. And polka dots. And cute elephants. Same deal as Bubbalu, reversible everything:

I also decided to do sheets and blanket instead of sleeping bags because I envisioned kids wiggling during sleep and those slippery sleeping bags sliding off the bunks onto the floor with the kiddos in them! So. I cut down sheets and made a custom bunk sized fitted bottom sheet and top sheet with a fitted end (so it would NOT pull out of the bottom).

I was out shopping for trailer stuff and saw the madras plaid and the pink and brown polka dot blanket and pillowcase sets on super clearance!  WITH an extra % off coupon....Score!! I was shocked - Lil Chick's blanket is a PERFECT match color and polka dot size/spacing! I was so excited!

I'm thrilled with the infusion of color and each kiddo feels like they have their own special space.  Add in some tote bins in the very back of the bunks and you have a mini playroom as well! The kids LOVE playing or reading in their bunks. And Mama gets to sneak chocolate late at night. Everyone is happy happy happy! :)

So, here is the official Before and After shot of the bunk bed portion of my Travel Trailer Makeover:

I think this is the last tutorial/talk through of the Travel Trailer Makeover series! Goodness gracious it only took me like 14 months to do 9 posts! Yay me! I should get a bloggy professional procrastinator award or something.

Maybe I can make it an even 10 and do the full trailer walk-through. Yep. I'll do that. In a few months or so.

THANK YOU for joining me on my Travel Trailer Makeover Series! I hope you have been inspired to add a little sass and custom style and COLOR into your travel trailer or RV!

Amanda - Vintage Dutch Girl


Check out all the posts from this Travel Trailer Makeover Series!

Thursday, August 22, 2013

Travel Trailer Makeover, Part 8: Master Bedroom and Privacy Curtains...

We have, er HAD, two ceiling to floor plain dark beige curtains instead of doors to separate and give privacy to the queen bed area from the main part of the trailer:


Just like the shower curtain project, they are attached at the top with glide tracks and glide tape sewn to the top edge of the fabric.

Glide tape is flexible plastic strips with little clips every 6 inches or so:


So, I pulled out the fabric and got to work.  The curtains were simple to design, just rectangles with hemmed edges.  I just copied the original beige curtain measurements. Actually, I added in more yardage width wise so it hung nicer and not so stretched flat.

For attaching the glide tape: Using a zipper foot on your sewing machine, set your (hefty upholstery size) needle to a side position:


and sew along the top and bottom of the plastic glide tape strip directly onto the top inside of your fabric:


Aaaaaaand.....Done!

I just snapped the holders into place along the glide strips. See how the extra yardage made those pretty ruffles? (Please don't tell my hubby I said "pretty" and "ruffles" to describe Lumi our trailer in any way shape or form.)

In order for the curtains to hang nicely I pulled a 'use what you have' trick and put fishing weighs in the corners of the curtains and safety pinned them into place:


The previous velcro tie backs were fixed to the wall with a special screw so I just replaced the blah fabric with chocolate brown, the same fabric that I used to recover the valances. (See valance project HERE.)


Add to that a new mattress (yeah, um, the trailer came with a 4 inch thick "mattress" to sleep on. Nope. Nada. Not happening. We spend A LOT of time camping.) and new bedding and the master bedroom area is looking very nice! Ahhh, it felt good to see nice fun colors and have the trailer looking more like us!


And if "by us" that means a wild and crazy mix that happens to blend, then YES, it looks more like us :)


Reminder of what this space looked like: Bedroom and side curtains BEFORE:


And now: Bedroom and side curtains after!


Next will be the last post in this series: the Bunk Beds! Oooh my FAVE part of this project!


Amanda - Vintage Dutch Girl


 Check out all the posts from this Travel Trailer Makeover Series!

Wednesday, June 5, 2013

Travel Trailer Makeover, Part 7: Chevron Slipcovered Couch

Hoo boy. Oh yes, that couch.  This was the biggest challenge in my Travel Trailer Makeover project.

Which is why it took me, oh, about 8 months (*ahem* 11 months) to get back to my blogging series. It was THAT traumatic. (NOT because I got lazy and distracted with other things...)


Here is the reminder Before pic, complete with diamond upholstery on the couch cushion back, front kick flap, curtain cornice thingy, dinette cushions as well as the lovely wallpaper border:


And yes, ALL off that diamond pattern fabric is sayonara  (Good riddance)  :)

This couch project took a lot of fabric up because I needed to match up both the chevron zig zag pattern AND the color. OY. AND I miscut and had a piece upside down (the wrong color pattern).  I had to change it, I knew it would bug me forEVAH.


I made the bottom kick pleat flap thingy first.  It's quite simple, just serged on the top, hemmed on the bottom and screwed into place on top of the couch base board :


I had to piece two LONG fabric widths together to match up the entire zig zag and to make the kick pleat which YES I wanted to do. It just made the whole thing look way more "finished".

Held open (ignore my not quite perfect lining up on the inside):


Lying flat:


Making/designing the couch slip cover took a LOT of measuring, remeasuring and then measuring again for good measure.

I sketched out a rough pattern based on the couch fabric pieces and measured like crazy.

This is what the couch slipcover ended up looking like pre-sewing assembly:


Each piece was labeled with where on the couch is went and which was was UP.  Also displayed in this pic a pile of toys. Because recovering a travel trailer couch takes time and I got super lazy with housework. Just keeping it real :)

After plotting the entire thing out, it was stitch time.  I systematically pieced the entire thing together using a tight stitch on my serger. I wanted it super strong!

Next up, take the slip cover out to the trailer and fit it over the original fabric on the couch:


It was at this point that I realized you cannot staple into METAL.  Yes, I though the back of the couch was wood and that I would be able to simple staple gun the fabric to the wood couch frame. Nope. Nada. It's metal.

SO. I have yet to do so, but I am planning on hand stitching/tacking the back of the couch slipcover to the original couch fabric with super strong upholstery thread.  Not ideal, but better than nothing!   It stays pretty well as it is a tight fitting slipcover.

So, there you go, before and after travel trailer couch makeover!


Amanda - Vintage Dutch Girl 


Check out all the posts from this Travel Trailer Makeover Series!


Monday, June 25, 2012

Travel Trailer Makeover, Part 6: New Dinette! Recover those cushions!

OK yes, this travel trailer factory direct diamond pattern fabric has GOT to go. I decided to attack the entire dinette cushion recovering in one day. Because that's how I do things. Nothing for a loooooong time then a huge flurry of activity. Remind you of my blogging schedule!? :)

So yes, these cushions:


 From this dinette:


Five cushions to recover, including two rather oddly shaped triangular corner cushions. Hoo boy. This is gonna be a big job.

First off I took off the old covers and measured every single bit of them to draw up my cushion patterns. Then I cut out the flat panel patterns from the chevron fabric.....taking pains to make sure the colors and zig-zags lined up appropriately with the other cushions. And making sure the fabric wasn't upside down.

Because if it IS upside down you may waste a good yard or so of fabric. {Ahem}

I had to seriously muscle the foam into some of these covers but wanted to make sure they were a snug fit.  I bought a cover button pack and covered them in parts of the chevron fabric. I used a long, upholstery size needle (see pic) to thread the button strings through the thick foam. Once again, lots of muscle used! My forearms were super sore the next day!


And now, confession time: I did NOT want to struggle with putting fancy, neat zippers on these five cushions so instead I closed up the openings with safety pins :)  Once again, saved a ton of time, and they are all hidden inside the dinette frame anyways!

All in all I was very pleased with how these came out. MUCH more fresh and fun. Here you go, the finished dinette makeover:
 And the before/after side by side shot:


Quite a difference, right!?

Next up: the dreaded COUCH project. OY.

Amanda - Vintage Dutch Girl

Check out all the posts from this Travel Trailer Makeover Series!

Travel Trailer Makeover, Part 5: Recovering Window Cornice Thingys!

For this part I will heretofore refer to the top of the window covering cornice thingymajigs as Cornici. I'm certain that it the correct pluralization of the word cornice, yes? Ok, maybe not, but I think it's fun. Cornici. Rhymes with Octopi. Sort of.

I decided to recover the curved Cornici in our new trailer (Lumi :)  with Premier Prints Topeka Solid Chocolate brown fabric that I purchased from Fabric.com, my fave online fabric store. well, all the regular windows cornici. I did have one flat cornice over the kitchen window that I used the chevron print to recover.

In the interest of saving my wrists and hands from days of aches and pains after tearing out hundreds of staples I decided to leave the previous fabric and just put the new fabric right on top of it. Ah yes, much more simple. And made the project quick quick quick. Well, as quick as you can get with a three and five year old around.

Another benefit from leaving the old fabric intact? It was super handy to see where the previous Cornici coverer had cut the fabric to help it stay tight and unwrinkled on all the corners and curves:


But hey, we are getting ahead of ourselves a bit. First off, I had to remove the industrial strength velcro strips that hold the side curtains on. Then i tried to get a rough measurement of the amount of fabric I'd need per cornice:


The comes the fun.When you are recovering just about anything you first center the cornici or chair seat board or whatever on your fabric.  You then wrap the fabric around from opposite sides, pull tight and staple from the centers out. Here's a wimpy diagram:


The key is to not create any lumps, bumps or folds on the visible side so keep turning your piece (or cornici) over and checking to make sure everything is smooth.

Last up, the corners. I'm not going to lie, they are not always easy. Just keep folding and pulling and stapling until they lie flat or look as good as you want them to. Once again, I was glad to have left the old fabric on so I had a folding template for the corners.

After I was all done, this is what the inside cornici looked like:


I reattached the velcro strips on the inside (for the side curtains) and then had my hubby help me hold the cornici in place to reattach to the trailer walls.

Less diamond pattern, more sassiness!


And the before n after of the kitchen cornice:


This made SUCH a huge difference in the cheerfulness of our trailer!  In fact, the next week or so my Mom also decided to recover her faded cornici with some fresh newer fabric.  It make such a huge difference! I dare you to try it :)

Amanda - Vintage Dutch Girl

Check out all the posts from this Travel Trailer Makeover Series!

Friday, June 8, 2012

Travel Trailer Makover, Part 4: Wallpaper Removal, a Dismantled Trailer and New Side Curtains...

Oh yes. the diamond wallpaper border. I was extremely nervous about this but had decided that if I was going to eliminate all of the other diamond/check gray/green/beige fabric I should also try to remove the wallpaper border:

I had tried to find out online if anyone knew what kind of wallpaper this was and how to best remove it. I found only one lady on an RV forum who said her new trailer had the peel n stick kind of wallpaper boarder and to just peel it off slowly. So, after the hubby's enthusiastic approval ("Sure, whatever you want Hon") I tried to peel back a small part of the border in a hidden spot to see if it would work.

  
AND IT DID! I sent this crazy face text to him:

 
Hee hee :) I was kinda excited. The pink arrow is pointing to the place where I had just removed the wallpaper! I found that as long as I peeled back sssuuuuuupppppeeerrrr slowly it did not leave much gunk behind.

However....
There IS a significant amount of sticky glue gunk left behind.  
I tried MULTIPLE methods at removing this gunk.  The very best method to remove the leftover peel and stick wallpaper gunk is spraying Goo Gone on it and leaving it set for a few hours. Then, come back with a plastic putty scraper (I wouldn't recommend a metal one - it might damage your wall!) and scrape like crazy.

Lather Rinse Repeat. Took about three sessions of spay, soak and scrape on each section. LOTS of elbow grease.

But hey, by the end you end up with a pile of yucky wallpaper and smooth, unsticky walls:


And apparently a daughter who is proficient at angry birds.

Next I took all the curtains, window valance thingys, queen headboard, venetian blinds and cell shades down. Fully dismantled and ready to be sassified:


The original, straight from the manufacturer look to the dismantled, oh-boy-what-have-I-gotten-myself-into look:


And you might notice on the taken apart photo, I had already begun to sew the new side curtain panels:


First I laid all the original panels on the new fabric to get measurements....and to take before/after photos :)  Then I serged and finished the edges. On the bottom I left a pocket so they could slide over the wall mounted curtain end holders:


The tops had to be gathered and then velcro sewn on. Yup, these hang from the cornice thingys by industrial strength VELCRO.  I love it! It means whenever my kiddos pull on them (because you know they will) and rip them down, nothing is damaged. It's just velcro. No problem!

Hoo boy, this post is getting too long! Next up: recovering the window cornice thingys.

Amanda - Vintage Dutch Girl

 Check out all the posts from this Travel Trailer Makeover Series!
Related Posts Plugin for WordPress, Blogger...