Showing posts with label T shirts...Sassified. Show all posts

Wednesday, September 8, 2010

Plain Gray Tank Gets Sassy...


After finally seam ripping all of that punky, non-cooperative black lace off of my cheapo gray tank top I was left with blah tank top with three seam ripped holes in it.

Lovely.

Not to mention the frustration of a failed project.

After the tank top came out of it's time out (Yes, I punish sewing projects that don't work out as I have planned them. They get a time out. Sometimes they get a forever out. ) I decided to have another go at it.

Blah:


So I dug through my not often enough dug through fabric stash and found some goodies.

Anyone remember the Olive Hope Shirt???

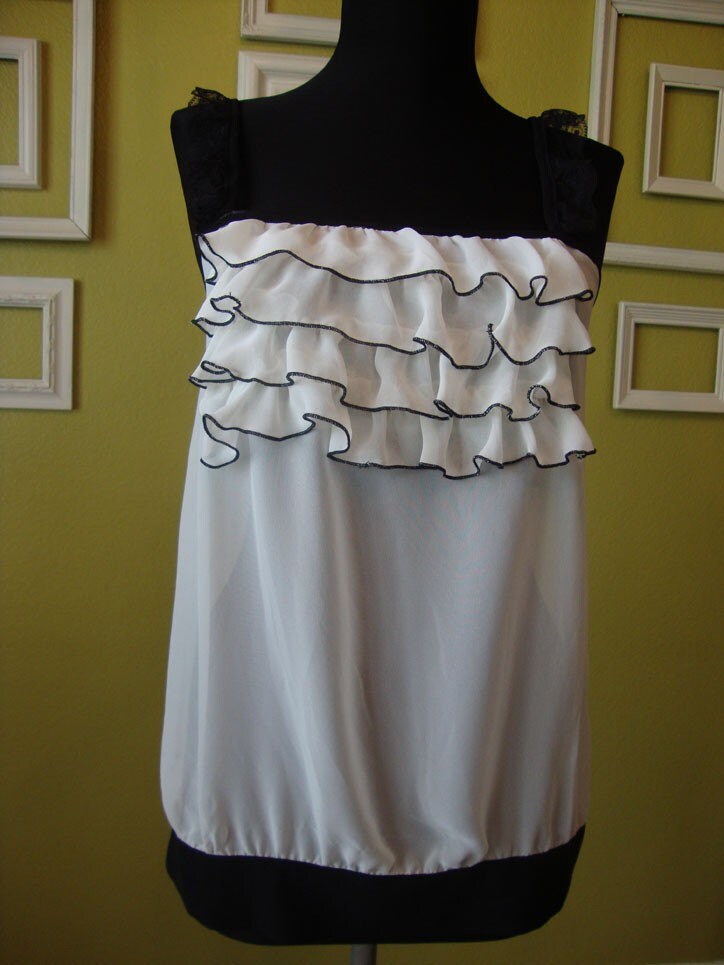
I decided I needed one too. Yup, let's try a patterned fabric this time around:


MUCH better. Covered up the torn holes and added a healthy dose of sass to a plain gray tank top:


I'd call this one a success...

A

Click HERE to Follow Vintage Dutch Girl on Facebook!


Monday, August 16, 2010

Top Tank Tops...


I have seven tank tops awaiting my sewing machine, free time and inspiration.

No, that's not a typo. Not several, SEVEN.

What can I say? They were only $3.50 each. Not too shabby if I can get some great individual everyday tank tops.

I often see photos of clothes or a sewing concept that I want to try and get all fired up and excited about it but forget about it the next week when the daily demands of keeping your children alive and well and the house sorta functionable gets in the way.

In an effort to harness and recall those creative thoughts before they escape out my ears I'm plastering them here in a post to be available for me when my free time decides to come back from it's extended vacation.

Hopefully, they might serve to inspire YOU as well:


(Anthro)


(Anthro)


(Banana Republic)


(Kate Spade)

(Kate Spade)


(Nordy's)

Whew! That's enough for now, more to come soon...

A

**Didja know you can find me HERE on Facebook? True story. Become a fan (or like) and get the latest Vintage Dutch Girl posts in your news feed. Oh, and it'll make my day! **

Friday, August 13, 2010

Black Edged Ruffle Tank Tutorial...


I'm loving my new Black Edged Ruffle Tank (or BERT for short) :


BERT pairs well with a casual denim skirt and snazzy flip flops. Yes, I wear bedazzled flip flops. Don't judge me.

So, ya wanna make one for yourself??? OK, here's the tutorial:

RUN to the nearest Walmart and pick up some of their Faded Glory tank tops that are now on sale/clearance for only $3.50 each. Confessions of a revampaholic: I just bought seven of them. SEVEN.

OK, you have your simple tank. You also need an old t-shirt to create the ruffles. I chose a flimsy tank (one on the left) that I never wore. Pretty sure it was a garage sale find:


Chop it up into three long strips....about 2 - 4ish inches wide by 10 - 20ish inches long, varying in width as you go. This project is extremely non-specific....so if you are a fly by the seat of your pants crafter, this project is for YOU. Here are my three oblong strips:


Use a rolled hem stitch in a contrasting thread along both short sides and one long side of each strip. Me? I chose black:


Baste (or use a loose gathering stitch) along the remaining unstitched long side 1/2 inch from the edge on all three strips. Hold on to the top thread and pull the bobbin thread to ruffle those up nicely.

Drape the widest strip along the tank top neckline and adjust the ruffles to fit to your taste. Layer #1:


It's already lovely but let's up the sassy factor, shall we?

Add the next widest layer and again adjust the ruffles as necessary:


Getting there!

Add the last and thinnest strip to complete the look:


Va va VOOM!

Finish adjusting the ruffles and pin all three layers to the tank top neckline:


Sew along your basting stitch to attach all three ruffly strips to the tank neckline leaving the raw edges out.

You are done! Throw on that lovely BERT tank and accessorize:


And yes, use a duckie peeking out from behind your rear. If that's not accessorizing I don't know what is...

A

**Didja know you can find me HERE on Facebook? True story. Become a fan (or like) and get the latest Vintage Dutch Girl posts in your news feed. Oh, and it'll make my day! **

Show and Tell Green

Thursday, August 5, 2010

Black Edged Ruffle Tank ReVamp...


I'm digging black edged ruffles right now. They have a lovely vintage Paris (the city, not the socialite) feel about them. Any idea what I'm talking about?

Here are some examples:


(D&G)


(Modcloth)

And this vintage sassy little number from Etsy:


Feeling all inspired I quickly ran up into my closet and grabbed a new but boring basic white ribbed tank:


Wallyworld. I think it was only 4 bucks. Thicker than the Old Navy ones. They seem to hold their shape pretty well and are nice and long. Perfect.

As soon as the kiddos were napping/quiet time I ran to the craft room and eventually came up with this:


However I though it needed a little extra sumpin' sumpin'....so I accessorized:


Ahhhh, MUCH better!

Things that are making me laugh about this photo:

A. the ducky peeking out from behind my tush.

B. The fact that I'm all dressed up on the top....with capri workout pants on the bottom!

C. My Hair. Pulled back and clipped up, with a huge yellow headband holding the massive stringiness away from my face. Quote from Bubbalu this morning, "Mommy your hair is big today". True story.

D. I took this picture with my CHIN. Yep, my face. My face took this picture. Loving my new iPhone4. It has many many features. But certainly, CERTAINLY someone could figure out how to do a vocal pic cue, right? Or maybe I'm just not cool enough to know about the vocal pic cue app. Does it exist? If so, please clue me in!

This black edged ruffle stuff is very fun. I'm thinking I'll attack a few more shirts before I switch the thread out of my serger because HELLO is that an ordeal.

Goodness gracious it has been FAR too long since I posted anything personally sewn by me. Tutorial coming soon, stay tuned!

A

**Didja know you can find me HERE on Facebook? True story. Become a fan (or like) and get the latest Vintage Dutch Girl posts in your news feed. Oh, and it'll make my day! **

Monday, July 19, 2010

A Test a Tank and a Toodlededoo...


How do you score on the Maternity SATs? I did quite well...and laughed myself off my chair. Missy is hilarious, I have a feeling you'll love her as much as I do.

This tank top is BEGGING to be knocked off. It's next up on my list:


And that's all I've got.

I normally can't seem to drag myself out of bed before seven but today I set foot into Walmart at 6:00. Yes, A.M. As in, the MORNING. Yep, I'm still stunned I did that. And tired.

I don't fully awaken until about 8:30 - 9:00 ish so I really don't recall all of the shopping and aisle scanning that I accomplished before 8:30.

And with a pleased sigh and a smile about my productive day I'm heading off to bed. Well, as soon as I finish my oreo mint blizzard.

Nighty night...

A

**Didja know you can find me HERE on Facebook? True story. Become a fan (or like) and get the latest Vintage Dutch Girl posts in your news feed. Oh, and it'll make my day! **

Wednesday, June 9, 2010

These Ruffles Used To Be Sleeves...


Everyone has that boring plain white long-sleeve button down shirt just hanging in their closet, right? In my case, that boring white plain button down shirt had an extremely unflattering criss cross tie detail between the two back seams that just screamed MATERNITY. Or OUTDATED. Either one, not good.

So.....I chopped it up.

(And no, I did NOT take a before picture. Mostly because I couldn't find my camera. Also because when inspiration hits I can't think straight until I've attempted to create said inspiration. And lastly because you ALL KNOW what a boring plain white long-sleeve button down shirt looks like, right???)

Step 1: The collar was seam ripped off and then restitched the seam down leaving a simple edge. A much more clean and crisp look. Besides, the collar was all ugly and slubby from use. It was time for it to go.

Step 2: The long sleeves were chopped off and the sleeve edges refinished. (Save those cut off sleeves for Step 4!)

Step 3: Goodbye ugly outdated maternity criss-cross back ties! Seam ripped those babies right out and tossed em in the trash. Just a bit of restitching the seams down without those ties and the back looks 100% better.

Lastly, and most importantly....

Step 4:
The sass. The fun. The RUFFLES! Seam ripped those cut off sleeves from Step 2 and cut double matching lengths for each side of front button placket.

(I had NO IDEA that my still-sorta-new-and-scary serger could do rolled hem edges. SAWEET! So stinkin' fun. Maybe I should actually finish reading my serger manual. It probably can do dishes and mop the floors too!)

Ran those matching lengths through the serger creating a rolled hem edge on each side, top and bottom and then created some sassy ruffles using a basting stitch with my regular sewing machine.

Pinned the ruffled goodness on, sewed em down and jumped up and down with glee. Sometimes I get so excited when a project I'm working on finally turns out the way I envisioned it that I just can't stand it and have to jump around a bit.


Hows this for some sass?


Looks much better with a black belt too:


(Pardon the bulkiness, I threw it on over a pink t shirt to snap this photo. Ha! I just noticed you can see the vertical lettering on my t shirt through the white shirt. :) I am SUCH a dork!)

OK, tear through your closet and start turning those long-sleeved shirts into ruffled short sleeved sass!

A

** Didja know you can find me HERE on Facebook? True story. Become a fan (or like) and see the latest Vintage Dutch Girl posts in your news feed. Oh, and it'll make my day! **


Photobucket

Wednesday, April 21, 2010

Sometimes They Have Potential...


Sometimes you are browsing through clothing racks and spot something with potential. You grab it, hopeful, until you see it is NOT your size. Or, about 3 sizes too big. Your hopes are dashed.

UNLESS....

I had a lovely friend bring me a cute shirt with potential that just happened to be about 3 sizes too big for her:


All she said???

"It needs you. Do whatever you want".

There's those words again! Love em.

This shirt sat on my "to be accomplished when inspiration hits" pile for a very long time. Anyone else have one of those?

And when I say a long time. I'm talking a LOONNNGGG time.

FINALLY inspiration hit. In full force.

I sliced and diced and added a wide belt hitting at that perfectly slimming, non-maternity looking spot and a sassy tie in the back and a Vintage Dutch Girl Flower pin to top it all off:


I'll admit, I wanted to keep this one :) But hey, it was fun to give it back to my sweet friend and see her smile!

A

***Didja know you can find me HERE on Facebook? True story. Become a fan and see the latest Vintage Dutch Girl posts in your news feed. Oh, and it'll make my day :) **

Tuesday, April 20, 2010

The Kate Shirt...


A sweet friend commissioned me to sassify a plain gray t shirt for her. She gave me some general guidelines, then said, "Well, do whatever you think".

I LOVE those words.

I wanted to create a design that melded together a few inspirational ideas, such as the Flower Patch Tee from JCrew:


Here's what happened to that plain, boring gray t shirt:


Dimensional (but not TOO poufy) flower swirls with petal detail:


Think of it like a permanent but casual corsage:


I loved sassifying this t-shirt. This one took a bit of hemming and hawing on my part before starting. Often I have to sit and stare at a project for a while before inspiration finally, belatedly, hits.

Inspiration for the Kate Shirt hit right in the middle of a week long puke and poop fest of the littles. I was going slightly crazy and it was a PERFECT mental vacation to be able to escape to the craft room and start sewing.

(*sigh*) I love sewing therapy...

A

***Didja know you can find me HERE on Facebook? True story. Become a fan and see the latest Vintage Dutch Girl posts in your news feed. Oh, and it'll make my day :) ***

Friday, March 26, 2010

Spring Green Lace Trimmed T-Shirt...


I have a bag of brand new Old Navy T-shirts just waiting to be sassified. I've actually had that bag for a good month now and just this morning FINALLY got around to attacking one.

It felt GREAT to be back to my sewing machine. I took a sewing holiday for awhile, but am feeling the sewing twitchies coming back full force! If only I had a clean sewing room in which to fulfill my sewing creations...looks like I found my Saturday clean-up project.

Anywho, I grabbed a lovely spring green T-shirt and give it some good ole Vintage Dutch Girl lace-trimmed t-shirt action. I love how it turned out:


This is NOT your Grandma's lace collar shirt!


You can find this springy green t-shirt listed this in the Vintage Dutch Girl Etsy Shop, hopefully more to come soon.

You know, after I clean up, purge and organize my sewing/crafting room... OY.

A

***Didja know you can find me HERE on facebook? True story. Become a fan and make my day***

Wednesday, March 24, 2010

The Olive Hope Shirt...


Awhile back I donated a t-shirt sassification for a fundraising auction. I finally was able to finish it and am naming the t shirt design in her honor, Olive Hope. We haven't forgotten this tiny baby girl, who is now resting peacefully in Jesus' loving arms. Rusty and Lynette, we are still praying for you!

The recipient and I chatted about general design and style and then I ran to my sewing room to attack it. The Olive Hope shirt is full of lots of circles and O's that ruffle up when washed and create a lovely flower effect.

Here is the Olive Hope Shirt in White:


Lots of dimension and ruffly goodness:


And yes, I DO know that these pictures make it look like the shirt is gray. Really now, I must get in the habit of taking photos when it is bright and sunshiny!

A

Monday, February 8, 2010

The Flouncy Skirt...with Tutorial!


Mama made me a Flouncy Skirt. It's nice and sassy, just like me:


It's flips and flounces as I walk and crawl:


or when I'm standing, just being me:


The Flouncy Skirt:


Step 1: Purchase or repurpose xx-large (as large as you can find) clearance with extra 50% off lowest price jersey t-shirt with bottom elastic ruching, or banding, detail. I found mine at an Old Navy clearance and paid under $2 for it. For this project it works best to have multiple layers of banding/elastic ruching to create your easy skirt waistband. Here's a perfect example of what I'm talking about:


Step 2: Measure your little girl's waist and add about two inches. Using this measurement, cut through one layer of the shirt to cut your new waistband. Leave an extra fourish or so inches on the length, like so:


Step 3: Put shorter right sides together and sew, creating a tube. The skirt waistband is already finished so no fussy finishing needed there. Yippee!

Step 4: Find a complimentary fabric for the Flounce main part of the skirt. I choose some leftover pink flannel that I am LOVING right now. I cut mine 6 inches wide by 30 inches long. Add extra width for a longer skirt or extra length for a flouncier skirt. Subtract inches in the width for a shorter skirt or subtract inches in the length for a less flouncier skirt (WHY anyone would want a LESS flouncier skirt, I have NO. IDEA).

Step 5: Finish (or leave raw, you rebel you!) both edges on the length and sew right sides of the width together creating a big tube of fabric. This will be your FLOUNCE.

Step 6: Gather and attach the flounce to the waistband. You can sew a basting stitch an inch lower than the top hem and gather the skirt before sewing the flounce to the waistband or you can be lazy like me and just hand gather and eyeball it, shoving folds of fabric under the presser foot as you go. I realize this sounds confusing, here's a diagram:


Sew the RIGHT side of the bottom edge of the waistband to the WRONG side of skirt flounce along the dotted line ( yes, leaving an inch or so of finished edge fabric out) attaching the flounce to the lower elastic edge of your already made waistband, gathering as you go. Here's a pic of mine:


Step 7: Cut a 4 x 4 square of fabric from leftover t-shirt and attach to under skirt making it a boyshort. Diagram:


Step 8: Try your Flouncy skirt on your daughter and giggle at the cuteness of it all:


Step 9: (optional) Dig through fabric stash and plan for 5 more FLOUNCY skirts...

A

make it wear it

Creations by Kara
Related Posts Plugin for WordPress, Blogger...