Showing posts with label T shirts...Sassified. Show all posts

Sunday, January 24, 2010

Lace Trimmed T-Shirt and Tutorial...


Step 1: Buy an inexpensive, boring plain v-neck from, well, ANYWHERE. Me? I chose an Old Navy dark gray tee:


See? It's boring. It needs some help.

Step 2: Dig through huge bag of vintage lace and notions lovingly thrifted and given to you by your Grandma K and pick out some sassy, funky or complimentary ribbon or lace. ( Hee hee hee, I'm imagining my ribbon saying, "My my Amanda, you are looking mighty FINE today!" Get it? Complimentary ribbon? OK, It's just me then.)

Step 3: (If needed) Serge or zig-zag stitch raw edge of lace or ribbon. (Yep, I'm slowly getting over my serger fear! However, it must still be having an effect on me because I completely forgot to take a photo.)

Step 4: Pin lace around neckline of t-shirt. Remember to not pin the back of the shirt while pinning. I pinned both the inside and outside edges of the lace all the way around the neckline:


I didn't have enough lace, but would have liked to go all the way around to the back of the neckband. Instead I serged the ends and pinned them down at the shoulder seam:


Step 4.2: Carefully miter (translation: fold it until it looks right) and pin lace or ribbon in place at the bottom of the "V" if you chose a v-neck style t-shirt. Of course, with a scoop neck or regular t-shirt this may not be needed...OR, you may need to every so often add a tiny fold to allow the lace to curve around the neckline correctly. Once again, just fold and pin until it looks right.


Step 5: Stitch the lace to the shirt along the inside/unfinished/serged edge first:


Step 6: Stitch the outside edge of the lace to the shirt, following the decorative pattern. I followed the curves as much as possible so it wouldn't flip up after washing:


Step 7: I stitched the folds down at the bottom of the "V" so it would lay flat. My stitch lines are marked in red:


Step 8: Admire your handiwork then jump giddily around your sewing room because you created something cute, individual, inexpensive AND sassy in a short amount of time:


Step 9: Try sassy new shirt on and attempt to take a self portrait without showing the camera or your face or earrings. Whoops, guess I didn't do Step 9 very well:

Pin It

Step 10: Wear it everywhere. It's a washable t-shirt so who cares if your 3 year old smudges it with jelly coated fingers? Just make sure that 3 year old isn't wielding a sharpie. I mean, I'm pretty good at getting stains out but that's pushing it.

This Lace Trimmed T-shirt can dress up jeans, dress down a suit jacket but can also be worn under a simple zip up hoodie paired with faded black yoga pants while feeding the kiddos lunch and doing laundry. Oh wait? Is that just me?

Enjoy your sassy Lace Trimmed T-shirts!

A


*** Make my day and become a fan on the Vintage Dutch Girl Facebook Fan page found HERE. ***

DIY Day @ ASPTL

U Create

oneprettything


Monday, November 16, 2009

White Baby Doll T Shirt Gets Some Sass...


Yes, I do realize this t-shirt sassifying thingy is getting a tad monotonous. But guess what? I LURVE it.

So, here we go again.

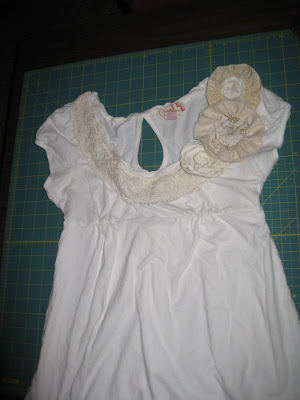
My adorable cake-baking sister, Brown Eyed Girl, commissioned me to sassify a few of her blah shirts. She has a cutely cut, white baby doll t-shirt that needed some oomph and detail.

We decided tone on tone would look fab. Here's what happened, before and after:


Three separate flowers, frayed to perfection and stitched down to be machine washable and hang to dry.


Add some trim to the neckline and VOILA!

A basic, nothing special t shirt is now a signature piece.


Throw on some rockin' jeans, cute wintry boots with poms on the ends of the laces (am I the only one who thinks those are adorable?!) and this shirt, and you are good to go:


A

Monday, November 9, 2009

The Sassifying Continues...


At the rate I'm going I soon won't have any normal shirts left:


I say that as if it's a BAD thing.


It's SO not a bad thing.

A

Thursday, November 5, 2009

Ms. Boring Pink T Shirt Gets a SASSY Makeover...


Meet Ms. Boring Pink (used to be maternity, but isn't anymore thanks to my scissors and sewing maching) T shirt.

She's BORING. She's BLAH. She needs some OOMPH and some SASS:


Enter extra flower petals laying around, my sewing machine and a napping baby and SHAZAM!!!

She's no longer boring and blah:


DEFINITELY some SASS going on:


I'll admit it, I about peed my pants when I washed it ( inside out) and it turned out PERFECT. Phew! Because really now, what stay-at-home-Mama do YOU know that can walk around in a dry-clean only T shirt? Puh-lease. It needs to be 'baby spewed yams on me again' proof.

And guess what? IT IS! Of course, I don't dare put it in the dryer, so 'hang to dry' it will be.

And Ms. Sassy Pink T shirt makes me smile just looking at her:


Now that's a makeover if I ever saw one...

A

p.s. I'm thinking about starting a little T-shirt Sassification business...you send me a blah shirt and I make it all nice and sassy (ruffles, flowers, decorative trim, petals etc.) . I would love some feedback from you, my lovely readers! So, whatcha think? Spill it in the comments.

Monday, September 14, 2009

Not Your Average Undershirt...


Well, I did it. I had warned my husband.

Inspiration hit and I just went with it.

Take one unused, rejected by the hubby because "it just doesn't fit quite right" white t-shirt and start CUTTING IT UP.

I love this. I really really really love cutting up shirts.

I may have an obsession.

Trace around your favorite fitting v-neck shirt and start cutting the shape out:


Trim the finished edge off the sleeves and set them aside. Use all leftover fabric pieces to cut out 2 sizes of heart shapes. I used a cookie cutter for my guide:


And ended up with a nice pile of cut-out heart shapes.

Took the sleeve edges/hems, cut them in half, and stitched them on to the v-neck:


Basted, ruffled and reattached the sleeves, then tacked on those heart shapes creating a lovely embellishment:


Then wait a week. Finally realize the shoulders are too wide, trim more off of the shoulders, seam rip the sleeves off, then reattach them correctly.

When all is said and done, your previously owned by hubby undershirt has transformed into:


Not too shabby for an unused rejected undershirt:


A

Tuesday, September 8, 2009

Maternity Shirt Renovation Episode 2...


Continuing in the thrifty renovation theme, I cut up some more Maternity shirts and made em all nice and sassy.

First up, you need to meet Mrs. Blah Black Maternity Shirt, sister to Mrs. Blah Yellow Maternity Shirt.

What can I say, I find a style that works and I go with it...should I go ahead and admit that not only did I buy black and yellow, but I also have it in pink and sky blue as well? Hmmm. Yeah, that's FOUR of the same shirts. They looked good, and they were ON SALE!

Internets, meet Mrs. Blah Black Maternity Shirt:


See? BLAH.

Notice the pins running up the left side? That's right, I sliced and diced and un-maternicized it.

However, it was still BORING, BLAH and PLAIN.

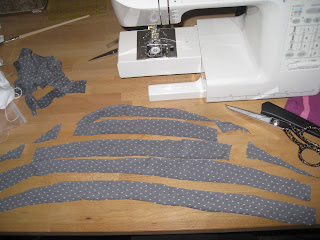
I dug around in my fabric stash (one or seven tote bins full) and pulled out two neglected leftover knit sleeve pieces. They are a dark gray with white polka dots on them. PERFECT! Fall is upon us, and gray is still in!

Slice off the edges:


and cut even width lengths (eyeball it, just say no to measuring with this project) and you have:


I got five per sleeve. I tried to quickly baste and ruffle them with my fussy, haven't had a tune-up in five years, sewing machine...which not surprisingly balked at the project.

What to do, what to do.

Craft bugs are a'biting and no sewing machine! NOT ACCEPTABLE.

Send sweet hubby over to borrow MIL's sewing machine (thanks Mom!) and get right back at it.

Quickly basted and ruffled those repurposed sleeves and sewed them onto Mrs. Blah Black Maternity Shirt, which transformed her to Miss Sassy Black Ruffly Shirt, sister to Miss Sassy Yellow Bunchy tank:


Ah, Miss Sassy Black Ruffly Shirt, I believe you and I are going to be long-time BFF's...

A

Tuesday, August 11, 2009

Maternity Shirt Renovation...

oneprettything

You know what? Maternity shirts can be VERY cute.

Also? Maternity shirts can be VERY flattering.

However? Maternity shirts worn when 8 months (gah!) postpartum may still be VERY cute...but are VERY unflattering.

So today I started cutting them up.

And cut some more.

And sewed a bit.

And embellished a bit.

And am very happy with the result.

Meet Mrs. Blah Yellow Maternity shirt:


I got sick of her making me look all poochy and pregnant...you know, since I'm NOT PREGNANT anymore...so I cut her arms off and pinned her sides smaller to match a shirt that currently fits me:


After sewing up the side seams I had all these extra pieces:


So I trimmed off the old side seam and was left with these randomly shaped pieces. I basted right down the middle, grabbed hold of one thread and cinchced it til it got all nice and bunchy:


Sorry, no bunchy pictures. I was too excited to finish my project to stop and take another picture. That, and I was talking to my sister on the phone while sewing, as well as yelling at Bubbalu to stop trying to make his sister topple over. I'm a multi-tasker but I do have my limits.

Anyways, I had three bunchy strips which I pinned to the front and sewed down. I'm very happy with the final result.

Meet Miss Sassy Yellow Bunchy Tank:


Not too shabby for an afternoon (less than an hour, really!) spent with my scissors, sewing machine, diet coke and a wildly insatiable need to craft something:


A
Related Posts Plugin for WordPress, Blogger...